|
Thrifting for furniture is one of my favourite things to do. It’s a great way to find good quality furniture that is inexpensive. It is so easy to transform your furniture, here are my top 5 favourite furniture flips that I found thrifting at my local Salvation Army Thrift store. Five  Before This 70’s end table was a fun transformation. I used Dixie Belle paint company matte black. I used gold gilding on the hardware and details to give it an elegant feel.  After Four  Before I used Fusion Mineral Paint color Limestone and decoupaged the palm leaf gift wrap to my Golden Girl inspired dresser.  After Three  Before I used 3 different Country Chic paint colours to create this whimsical blended bench. I even painted the vinyl seat!  After Two  Before I blended this beauty with 4 different pinks and purples from the FAT paint company. I added a floral transfer to create a big impact.  After One  Before This tired mid century modern dresser was transformed into a statement piece. Painted in Fusion Mineral Paint in a fresh, bold geometric pattern.  After Refinishing furniture is a fun, creative way to make a big impact in your space. Make sure to hit your local thrift store to thrift and transform your own furniture. Happy painting!
0 Comments
 I love trying out new products and was thrilled when Dixie Belle launched their new Gemstone Mousse. These gorgeous metallic colours come in 4 highly pigmented metallic shades, Golden Gem, Diamond, Amber and Garnet. They are water based and have a rich, creamy texture. They are a great product for those with environmental sensitivities, since they are non toxic and don’t smell.  This gorgeous ornate console was the perfect piece to use Gemstone Mousse on. Here is how I did it! Materials
 Step One Prepping is the most important step when painting furniture. I started by giving it a quick scuff sand and then removed the dust with a damp rag. I used White Lightning to clean the console and used a damp clean rag to wipe off residue.  Step Two Once dry, I applied Putty as a base coat.  Step Three Once my base coat was dry, I applied a coat of Steel Magnolia with the Scarlet brush for a smooth finish. I applied a second coat once my first was dry.   Step Four I painted the basket weave pattern on the console in Silver Bullet.  Step Five I gave the Diamond and Golden Gem Gemstone Mousse a good shake and stirred it until it had a creamy, smooth texture. Using a fine artist brush, I used a small amount and brushed it evenly on the legs and details of the console. A little goes a long way. After 30 minutes it was dry.     Step Six For extra durability I applied Dixie Belle flat Clear Coat. That’s it! That is how you can easily use Gemstone Mousse on your next project to add some flair. It is so easy to apply and makes a big impact on your project. You can use Gemstone Mousse on furniture, hardware, stencils and Dixie Belle Silkscreen Stencils. Make sure to try some out on your next project. Happy painting!    Spring is finally here! With the warmer weather and flowers in bloom, it’s a time to refresh and recharge. Changing up your decor in the Spring is a great way to refresh your space. An easy way to find unique and inexpensive Spring decor is to hit your local Thrift Store. I headed to my local Salvation Army Thrift store to see what I could find. Here are a few items I found on one of my trips.  These whimsical plates would be beautiful as art on your wall.  Rattan furniture is back and is a big trend in design. This side table would be a great addition on a patio or to display your plants.  Fill this mason jar beverage dispenser with cucumbers and mint to keep hydrated in the warmer months.  Enjoy the warm weather and eat outside without having to worry about bugs getting into your food with this food tent.  Change up your dinnerware with these gorgeous plates.  Take some time to enjoy a cup of tea with this cute teapot and tea cups.  Head to your local thrift store to refresh your decor for spring. Happy Thrifting!
 Painting fabric is easy to do with Dixie Belle Paint. It is a great way to add interest to your textiles and decor. I wanted to add some colour in my dining room and stenciled a plain tablecloth. Here are the materials and steps to create your own. Materials
 Step 1 Put your drop cloth on your table and place your tablecloth on top. This will help ensure that your paint doesn’t seep through onto your table.  Step 2 I had a general idea of my design plan. I wanted to have small groupings of the fern and palm leaves on my tablecloth. I started with my first stencil placement close to the bottom of the tablecloth. Making sure to firmly press my stencil on the fabric.  Step 3 Starting with Mermaid Tail, dab a small amount of paint and wipe off the excess onto a shop rag. Gently dab the paint in a thin layer on your stencil. Continue to add thin layers until your stencil is completely covered. Remove your stencil while the paint is still wet. Continue stenciling your leaves in different directions and in a random pattern over your tablecloth. Clean your stencil once your are finished.  Step 4 Once my tablecloth was dry, I placed my leaf stencil close to my first Mermaid Tail leaf. Using my next colour Mint Julep, I added a small amount of paint and gently dabbed it in thin layers to fill in the stencil. Continue stenciling Mint Julep leaves until you have added a pair to all of the Mermaid Tail leaves. Once you have completed your Mint Julep leaves, clean your stencil.   Step 5 When your tablecloth is dry, fill in any areas by stenciling in your next colour Lemonade. Continue this step until your tablecloth is filled in, with minimal gaps.   That’s it! You have created a beautiful, colourful tablecloth for your dining room to enjoy. Happy painting!     Adding art into your decor is a great way to bring personality to your space. Did you know that you can easily create art using Dixie Belle Paint? Creating your own art doesn’t have to be intimidating. I will show you how you can make your own contemporary abstract art that your family and friends will swoon over. Here is what you need and the steps to create your own art. Materials
Step 1 Paint five canvases in Dixie Belle’s Cotton and 1 canvas in Caviar.   Step 2 Once the paint has dried, it’s time to plan the design. Place two of the canvases side by side.  Using your pencil, draw half a circle on one of the canvases. You can also use a can to draw an outline if needed. Keep in mind, the great thing about art is that it doesn't need to be perfect.  Draw the other half of the circle on the other canvas. This will create a full circle when you place both canvases together. Paint each half circle in Caviar.    Using a dry brush, gently brush the wet paint around the outline of your half circles. This will hide any imperfections. Step 3 On the next canvas, tape a slightly diagonal line from the bottom to the top of the canvas.  Tape another two lines in a X pattern over the center line.   Add a horizontal line where the other lines meet.  Paint the canvas in Cotton and remove the tape while the paint is still wet.    Step 4 On the fourth canvas, tape a vertical line slightly more than half of your canvas.  Paint the smaller side in Caviar.  On the fifth canvas, tape a horizontal line slightly more than half of your canvas.  Paint the smaller section of each canvas in Caviar and remove the tape while it’s wet. Using a dry brush, gently brush the wet paint. This will give it a faded effect.  Step 5 On the final canvas, dab a good amount of Caviar on a small artist brush. Starting at the top left, make small brush strokes in a line moving toward the right side of the canvas. Keep about an inch to an inch and a half between each stroke.  Create another line of brushstrokes moving from left to right approximately 2 inches below your first line. Continue this step until you have filled your canvas. Remember this doesn’t need to be perfect.   Step 6 Once your artwork has dried, paint the sides of each canvas to give it a polished look.  That’s it! You have created gorgeous, contemporary, abstract art. Find the perfect spot to hang them in your home to showcase your artwork. Happy painting!   One of my favourite thrifted finds from my local Salvation Army Thrift store is this demijohn glass vase.  I didn’t pick it up initially but after I left I could not stop thinking about this vase. After doing a little research, I found a very similar vase from Pottery Barn that was worth up to $249! I immediately went back to pick it up. Luckily it was still there and was only $8.99!  Photo credit Pottery Barn This was such a great find and I had the perfect spot for it. Check out the 3 different ways I styled it. Happy thrifting!    I found this ceramic column in my local thrift store, it was the perfect piece to display one of my plants from my growing collection. Since the colour did not work I decided to use Dixie Belle Paint to create an aged patina effect. Here are the materials I used and steps on how you can easily replicate this look. here to edit.  Materials
Step 1 I started by giving this column a good cleaning with Dixie Belle’s White Lightning to remove any dirt and residue. Step 2 Once it was completely dry, I used Gravel Road and painted it as my base colour.   Step 3 Using my wax paper as a paint palette, I added my colours Hurricane Grey, Caviar, Putty, Driftwood and Hampton Olive. This is a great way to have all of your colours on hand and mix colours if needed.  Step 4 Once my base coat was completely dry, I used driftwood to create a colour wash. I dipped my brush into the paint, then into a small container of water and began applying it in small sections. I gently wiped back the colour wash with a damp shop rag, pushing it into the crevices. I continued this step layering on each colour and blending it into the finish with a clean brush to get an aged patina.    Step 5 Using a clean brush, I added a light dry brushing of Caviar and Driftwood. To dry brush, dip your brush into a small amount of paint and then wipe off excess (until it’s almost dry) and then gently wipe the side of your brush along the ridges of the column, along the base and in the crevices at the top to add some depth.   Step 6 Once my column was completely dry, I used my Best Dang wax brush to apply a thin layer of Best Dang wax in clear. I waited 15 minutes and then buffed with a shop rag.  Step 7 To add more depth, I used Gilding wax in Zinc and Black. I used a shop rag to apply it to the base and ridges of the column. After 12 hours I lightly buffed it.  And that’s it! You have created a gorgeous aged patina effect. This is a great technique to have some fun with and try experimenting with different colour combinations. Happy painting!     Adding pillows into your decor is a great way to add texture, tie in accent colours and creates a comfy vibe in your space. Did you know that you can inexpensively make your own pillows using Dixie Belle Paint that look like you purchased them out of a designer store? Here is how you can easily create your own blended stenciled pillow. Materials
Step 1 Iron your pillow cover to remove any wrinkles. Step 2 Unzip your pillow cover and place a piece of wax paper inside to avoid any paint seeping through to the other side of your cover. Step 3 Center your stencil on top of your pillow cover and tape it into place to avoid any movement while you are stenciling.   Step 4 Add a small amount of your darkest colour (Cape Current) on your stencil brush. To get the best results, dab off most of your paint onto your shop rag. This will ensure that you have a crisp, clean outline and avoid the paint bleeding underneath the stencil.  Step 5 Place one hand on your stencil to keep it steady. Starting at the top section, begin dabbing around the outline of your stencil. Continue gently dabbing around the outline and blend it in a downward motion. Continue this step until you have completed the edging of your whole stencil.    Step 6 Using a clean stencil brush, dab your brush in your next colour (Sea Glass). Dab off most of your paint onto your shop rag. Starting where you finished your last colour, gently dabbing your paint and blend it in a downward motion filling out the remaining area. Continue this step until you have completely covered your stencil.   Step 7 Using a clean stencil brush, dab it into your next paint colour (Gold Digger). Remove excess paint onto your shop rag and gently dab your metallic paint on various small areas on your stencil. I added most of my metallic paint on the bottom outline of my stencil and blended it in an upward motion. Continue until you have added your metallic paint evenly over your pillow cover.  Step 8 Carefully remove your stencil from your pillow. Within 15 to 20 minutes your pillow should be dry.  Step 9 Remove the wax paper and put a pillow cushion into your cover. That’s it! You have created a beautiful designer pillow! Find the perfect spot to showcase your pillow. Happy painting!  With many of us spending more time at home, it is important to keep our spaces feeling fresh as well as giving ourselves time to be creative. One easy way to do this is to refresh your tired furniture by painting it. There are many excellent quality paints on the market that make it so easy to do. The creative aspect of it is what I really love, it’s very therapeutic. 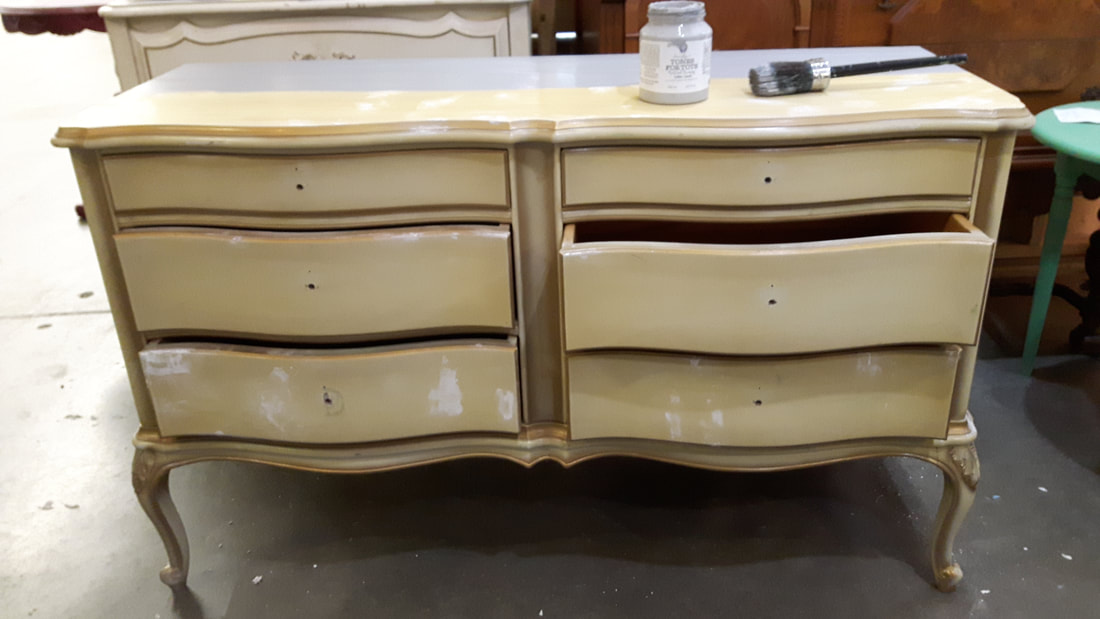 I found this vintage french provincial dresser on one of my trips to my local Salvation Army Thrift Store. If you grew up in the 60’s, 70’s or even the 80’s, you may have had one of these dressers in your bedroom. It’s a very sturdy and well made piece but it has yellowed over the years. It really needs an update. My first step in the transformation is to give it a quick prep. Just clean with TSP or warm water and vinegar to remove any residue. I used 220 sandpaper to give it a scuff, giving the surface a bit of "tooth" and then wipe off any residue with a damp cloth. Click here to watch a video on how to properly prep. I used Fusion Mineral paint Ultra Grip to help the paint adhere, since the dresser was laminate. You can also use any high quality furniture paint primer for your project. Click here to learn how to apply Ultra Grip. After 12 hours I was ready to start painting. I used Fusion Mineral paint Little Lamb and metallic pearl on the edging and details to really make it stand out. After two coats it was done! Click here to learn more about Fusion Mineral Paint.  I love how easy it was to transform this outdated yellowed dresser into a gorgeous statement piece. Have a tired piece of furniture that needs some love? Consider painting it, and have some fun while getting creative. Happy thrifting!
 Having artwork in your home is a great way to show your personality. It is also a simple way to tie in colours that you want to accentuate in a room. Creating your own artwork gives you control over the colours you want to bring into your space. Did you know you can use Dixie Belle Paint to create beautiful paint pour art? Here are the materials and steps to make your own artwork. Materials
 Step 1 Set up your drop cloth- this DIY is a little messy! Paint your canvas in Cotton or whatever white you have on hand. This will give you a smooth surface to start on. Step 2 Once it’s dry, pour resin into all of your cups. I am using smaller cups since I am working with a smaller canvas, for larger canvases use larger cups.  Step 3 Using your spoon add a small amount of paint into your resin (approximately ¼ tsp or so). If too much paint is added your mixture will not flow. Gently mix with dried spaghetti or the end of your spoon avoiding creating bubbles. Mix until your mixture is opaque. Complete this step with each colour mixture.    Step 4 Add one or two drops of silicone oil into each cup. This will (create a circular pattern) add circular holes in your paint surface and reveal layers of colour.  Step 5 Place a few empty cups under your canvas to elevate it so it does not sit directly on your table.  Use 4 or 5 clean cups (amount of cups depends on the size of your canvas, the goal is to make sure you have enough paint to cover your canvas). Slowly pour and layer different colours into each cup. Complete this step until all of your cups are filled.   Step 6 Take one of your filled cups and quickly flip upside down on the canvas. Leaving the cups upside down will help all of the paint to pool on the canvas. Flip your remaining cups upside down in various spots on your canvas and let them sit for about 3 or 4 minutes. Gently tap the top of each cup to help the paint move down to the canvas.   Step 7 Now the fun begins! Gently lift your cup, holding it over your canvas for a minute to allow all of the paint to drip out. Continue this step until each of your cups have been emptied onto your canvas.   Step 8 Carefully place your hands on either side of your canvas and slowly move it in a back and forth motion, and from side to side until your paint covers your entire canvas. Take your time with this step. You will notice how the paint will change and the colours will merge. If there are some spots around the edges that are not covered you can add more paint with remnants from your layered paint cups. Once you are happy with your paint pour, set it back down on your cups and let it dry.   After letting my canvas dry overnight it was ready to hang the next day. I love how it turned out! This was so easy to do and looks fantastic in my space. Need to refresh your space with some unique artwork? Then try out this DIY! Happy painting!  |
Archives
July 2021
Categories
|
 RSS Feed