|
With many of us spending more time at home, it is important to keep our spaces feeling fresh as well as giving ourselves time to be creative. One easy way to do this is to refresh your tired furniture by painting it. There are many excellent quality paints on the market that make it so easy to do. The creative aspect of it is what I really love, it’s very therapeutic. 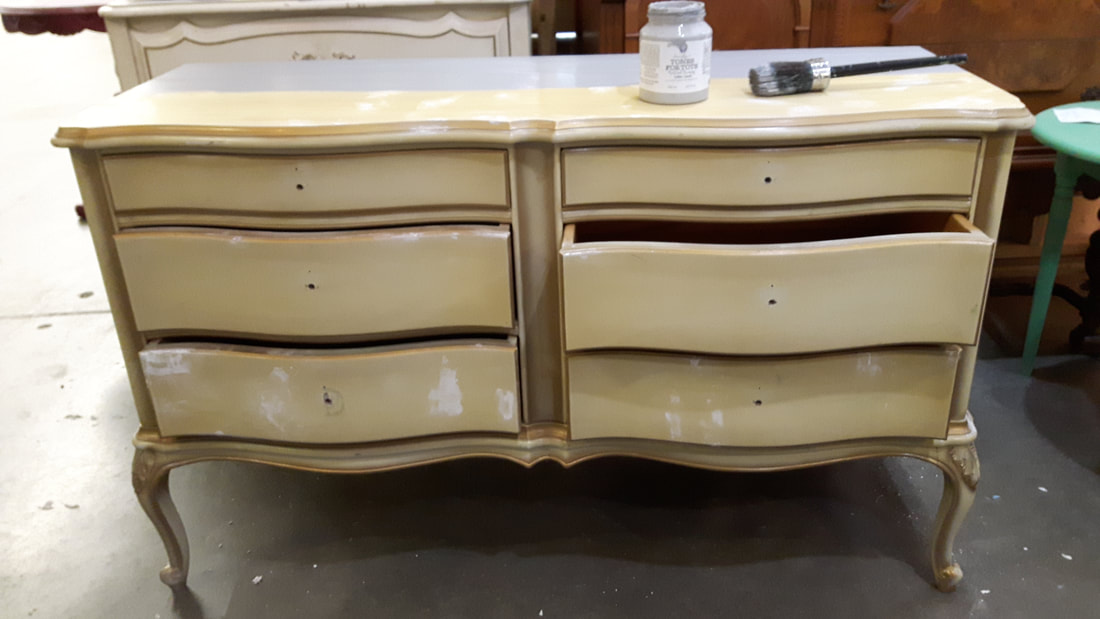 I found this vintage french provincial dresser on one of my trips to my local Salvation Army Thrift Store. If you grew up in the 60’s, 70’s or even the 80’s, you may have had one of these dressers in your bedroom. It’s a very sturdy and well made piece but it has yellowed over the years. It really needs an update. My first step in the transformation is to give it a quick prep. Just clean with TSP or warm water and vinegar to remove any residue. I used 220 sandpaper to give it a scuff, giving the surface a bit of "tooth" and then wipe off any residue with a damp cloth. Click here to watch a video on how to properly prep. I used Fusion Mineral paint Ultra Grip to help the paint adhere, since the dresser was laminate. You can also use any high quality furniture paint primer for your project. Click here to learn how to apply Ultra Grip. After 12 hours I was ready to start painting. I used Fusion Mineral paint Little Lamb and metallic pearl on the edging and details to really make it stand out. After two coats it was done! Click here to learn more about Fusion Mineral Paint.  I love how easy it was to transform this outdated yellowed dresser into a gorgeous statement piece. Have a tired piece of furniture that needs some love? Consider painting it, and have some fun while getting creative. Happy thrifting!
0 Comments
 Having artwork in your home is a great way to show your personality. It is also a simple way to tie in colours that you want to accentuate in a room. Creating your own artwork gives you control over the colours you want to bring into your space. Did you know you can use Dixie Belle Paint to create beautiful paint pour art? Here are the materials and steps to make your own artwork. Materials
 Step 1 Set up your drop cloth- this DIY is a little messy! Paint your canvas in Cotton or whatever white you have on hand. This will give you a smooth surface to start on. Step 2 Once it’s dry, pour resin into all of your cups. I am using smaller cups since I am working with a smaller canvas, for larger canvases use larger cups.  Step 3 Using your spoon add a small amount of paint into your resin (approximately ¼ tsp or so). If too much paint is added your mixture will not flow. Gently mix with dried spaghetti or the end of your spoon avoiding creating bubbles. Mix until your mixture is opaque. Complete this step with each colour mixture.    Step 4 Add one or two drops of silicone oil into each cup. This will (create a circular pattern) add circular holes in your paint surface and reveal layers of colour.  Step 5 Place a few empty cups under your canvas to elevate it so it does not sit directly on your table.  Use 4 or 5 clean cups (amount of cups depends on the size of your canvas, the goal is to make sure you have enough paint to cover your canvas). Slowly pour and layer different colours into each cup. Complete this step until all of your cups are filled.   Step 6 Take one of your filled cups and quickly flip upside down on the canvas. Leaving the cups upside down will help all of the paint to pool on the canvas. Flip your remaining cups upside down in various spots on your canvas and let them sit for about 3 or 4 minutes. Gently tap the top of each cup to help the paint move down to the canvas.   Step 7 Now the fun begins! Gently lift your cup, holding it over your canvas for a minute to allow all of the paint to drip out. Continue this step until each of your cups have been emptied onto your canvas.   Step 8 Carefully place your hands on either side of your canvas and slowly move it in a back and forth motion, and from side to side until your paint covers your entire canvas. Take your time with this step. You will notice how the paint will change and the colours will merge. If there are some spots around the edges that are not covered you can add more paint with remnants from your layered paint cups. Once you are happy with your paint pour, set it back down on your cups and let it dry.   After letting my canvas dry overnight it was ready to hang the next day. I love how it turned out! This was so easy to do and looks fantastic in my space. Need to refresh your space with some unique artwork? Then try out this DIY! Happy painting!  Adding a centerpiece to a table or console is a great way to create a focal point and cheerful element into your space. I had some leftover wood from previous projects and made a box, but you can buy a premade box at most craft stores.  I love the warm and vintage feel of Modern Farmhouse decor, so I will transform this new wood box into a worn, salvaged centerpiece. Here is how I did it and the materials needed to create your own Modern Farmhouse style centerpiece. Materials
Step 1 Pour a small amount of Gravel Road paint into a container. Dip your brush into your paint, then into your container of water and start painting. This process of dipping your brush in water will help the paint absorb into the wood and stain it. Once you have completely covered the first side, take a shop rag or a damp lint free cloth to wipe off the paint, allowing the wood grain to come through. Repeat this process on all sides of your box.    Step 2 Once dry, use your spatula or palette knife to layer on your Dixie Mud to the ends and edges on each side of the box. This will add character and texture to your surface. Dry time can be between 4 to 24 hours depending upon how much mud is applied.   Step 3 Paint your box in Cotton, making sure to add lots of heavy brushstrokes. Once the first coat has dried, apply a second coat.   First coat  Second coat with lots of texture Step 4 Using the sandpaper, distress the box, with particular attention to the edges. To give it an authentic distressed look, sand in a circular motion. The wood stain that we did in step 1 will begin to peak through.   Step 5 Mist Easy Peasy Wax on one side of the box and wait 30 seconds before wiping off. Repeat this process on all sides of your box. After adding the wax the finish was so smooth!  Step 6 Using your fine artist brush, gently wipe your Dixie Dirt into the texture on the sides of your box, a little around the edging and anywhere else you would like to add some depth and patina.   Step 7 That’s it! Your centerpiece is done. Add flowers, greenery or seasonal decor and place it on a mantel, dining room or console table. To add more detail, you can also add a stencil. I used Dixie Belle new mosaic Silk Screen stencil and distressed it for more character.    This was such a fun and easy transformation! Click here to order your Dixie Belle products to complete this DIY. Happy Painting!
|
|
 RSS Feed